Week 5 of Dropping In Sew Along
>> Tuesday, September 1, 2020
Welcome to the Fifth Week of the Dropping In quilt sew along! It might not be the final one :)
Purchase the Dropping In pattern in my online shop
Paper pattern available through QuiltWoman.com
These posts will always be available so start when you're ready!
Somehow we are already at the end of the sew along - that means it's time to turn our quilt top into a quilt! I usually get hung up and stop at this point in a quilt project - quilting the quilt continues to be the step that I need the most practice at.
I'm so glad we're doing this together so I actually get to finish and enjoy my quilt.
I did start to quilt my Dropping In quilt, but I'm not finished so I'm going to add one more week to this sew along and call it a bonus week ;) I'll even set up a link party so we can share our progress and hopefully some of us (me!) will even have finished quilts.
Make a Sandwich
This is the tricky part for many of us quilters who decide to quilt our own quilts; we need to get backing and batting and then find space to put the three layers together.
I miss having my monthly Sew Days with my guild because we would pin our quilts as a group using raised wide tables. Now I just feel lucky enough to have a big enough floor space in my house to layer on the floor. I'm not a basting spray person, although the lap size of this quilt would be a great size for this method. If you have nice weather and the space, basting outside is also an option.

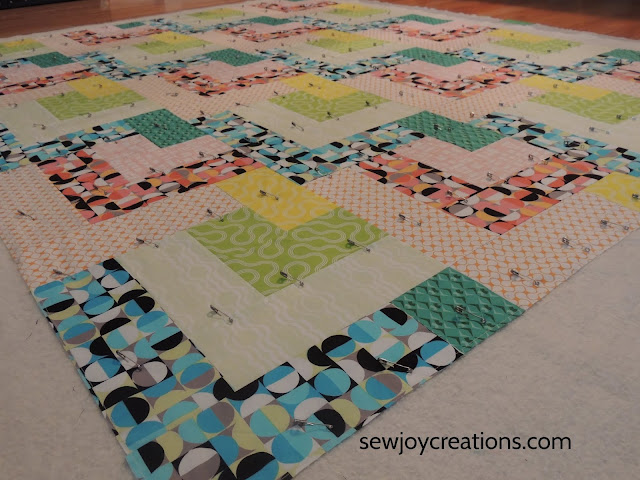
The trick to basting is making sure all three layers and joined and in the process no puckers or pleats or bumps develop. I use a painter's tape to tape my backing to the floor, taping opposite corners then the middle of each side. Then I do the same with the batting. Once these two layers are flat, I carefully place the quilt top over the layers with approximately 2" of batting and backing at each side.
Think Twice, Pin Once
I've learned to plan my quilting before pinning and I did this time too. The last thing you want to do is pin the top and then realize as you go to your machine and to start quilting that you have to remove each pin as you come to it. Yes you will probably start to remove pins after you've quilted some parts, but removing pins the whole time really doesn't keep the layers tight together.

I decided to quilt this quilt using one of the built in stippling stitches on the PFAFF performance icon. I like the way this stitch looks, it doesn't take a lot of time, and I think it complements all the circles in the fabric and contrasts with the squares and rectangles of the blocks. This meant that I could plan where to put my pins to give me spaces to quilt down the quilt top.
Thread Choice

One more part of the quilting process is to choose the color of thread to use. I'm not a thread expert but I do know that Aurifil is one of my preferred brands. I laid out a few options and took a photo so you could see how different neutral threads blend but also contrast with the different fabrics. I choose to use the light green (Aurifil 2880) because it blends in with the majority of the Good Vibes fabrics on the top.
Quilt

Now it's time to enjoy the process of quilting the quilt. Plan to take breaks! If you're like me and you don't usually push an large top through and under a machine, realize this step is a workout. I like to make sure the quilt is supported to the left of the machine so it doesn't drag and cause more lifting and also potentially pulling under the needle. I start in the middle of the quilt and work my way out evenly on both sides. I did find that using quilting gloves made it easier to manoveur the quilt even though I really wasn't doing any free-motion quilting - the gloves just made it easier to move my hands down the quilt. Eventually this part is fun for me but I really have to set myself up for success.
Week 5 to dos
Hopefully my tips will help you get your quilting accomplished this week. Even setting a timer for 15 minutes or telling yourself you'll do 5 rows of quilting then stop will help you get the top quilted.
If you get all of your quilting done, then it's trimming the excess off the sides of the quilt and adding the binding. I plan to use next week's bonus week for those 2 steps!
~ Come back next week for the Bonus Week
Join me in my facebook group where you can share photos of your fabrics. I'm also on instagram and using the hashtag #droppinginquilt to show my progress.
Let's #sewjoywithgoodvibes!
Sarah V.
Join my newsletter list to stay up to date with sew alongs, pattern releases and more. Plus you get to enjoy freebies that are only available to my newsletter subscribers. Click the image below to sign up!


0 comments:
Post a Comment